# Week 3: Static Code Analysis (ii)

This week, we will complete the static analysis rung of the CI pipeline. In doing so, we'll add code formatting to the room-checking sample application. Further, we'll put in place checks to ensure that code that does not comply with our linting and formatting rules does not end up in our codebase.
Throughout this week, we will be addressing the following questions:
- How can we ensure that a team follows a consistent coding standard?
- How can we enforce these standards?
- How can we integrate these standards into our CI/CD pipeline?
- How can I deploy my web applications?
# Lesson Dependencies 🔨
- You will need to ensure you have the version control tool Git installed (opens new window)
- You'll need to know the basic Git Commands (e.g.,
checkout -b,push, andcommit)
- You'll need to know the basic Git Commands (e.g.,
- While you can use any text editor for this session, I recommend that you install VS Code (opens new window)
# Getting the week two starting code base
In your command line shell, run:
git clone --branch week-3-starter-code https://github.com/joeappleton18/solent-room-finder.git solent-room-finder-week-3

- Navigate into the created  `solent-room-finder` folder: `cd solent-room-finder-week-3`
- Install the dependencies: `npm install`
- Run the development server: `npm run dev`
- Open [http://localhost:3000](http://localhost:3000) with your browser to see the result.
2
3
4
5
6
7
8
# TASK 1: Set up
TASK 1: Set up
Follow the steps above to, ensure you have the lesson dependencies set up: including the starting code base.
# Prettier
Prettier is an opinionated code formatter; however, as you have seen, last week, our linter already formats code (to a degree). It may at first seem similar to a linter; however, on closer inspection, there are some subtle differences:
Linters are mostly worried about code quality: eg no-unused-vars, no-extra-bind, no-implicit-globals, prefer-promise-reject-error
Prettier prints your whole program from scratch applying only formatting rules: eg: max-len, no-mixed-spaces-and-tabs, keyword-spacing, comma-style. As a developer, you never have to worry about formatting your code again.
# TASK 1: Installing Prettier
TASK 1: Installing Prettier
Let's get going with prettier awesomeness:
- Install the dependencies:
npm install --save-dev eslint-config-prettier prettier - Notice how we installed
eslint-config-prettieralong withprettier. ESlint can do some formatting for us; however, we don't want it to conflict with prettier. Theeslint-config-prettierpackage ensures that only prettier's formatting rules are used. We can use it by addingprettierto the extends array of oureslintrc.jsonfile:
`eslintrc.json`

```JavaScript
{
  ...
  "extends": [
    "next/core-web-vitals",
    "eslint:recommended",
    "plugin:@typescript-eslint/recommended",
    "prettier"
  ],
 ....
}
2
3
4
5
6
7
8
9
10
11
12
13
eslintrc.json: adding prettier
You can now run prettier:
npx prettier --write .. This command will automatically fix the formatting in your code.Like ESlint, there is a VS code plugin for prettier (opens new window). Install the plugin.
We can now update our
./vscode/settings.jsonfile to auto format on save:
{
  "editor.codeActionsOnSave": {
    "source.fixAll.eslint": true,
    "source.fixAll.format": true
  },
  "eslint.validate": ["javascript"],
  "editor.defaultFormatter": "esbenp.prettier-vscode"
}
2
3
4
5
6
7
8
.vscode/settings.json: these are what my final settings look like
- Finally, in your root directory create the following two files:
.prettierignoreand.prettierrc.json..prettierrc.jsonallows us to add custom rules, let's add the following:
{
  "printWidth": 80,
  "bracketSpacing": false
}
2
3
4
.prettierrc.json: Prettier already has a solid rule set; above, I am tweaking it to my preferences. Have a play in the playground if you want to add further rules (opens new window)
# Husky
If you've got this far, you've come a long way: give yourself a pat on the back. However, we are not quite finished. Would it not be nice if we could automatically run checks (e.g., linting, formatting, testing, and type checking) before each commit. This is where Husky comes into play.
# TASK 2: Installing Husky
TASK 5: Install Husky
npx husky-init
npm install
Next, we need to set up some scripts in our package.json file, these will run on each commit:
"scripts":
	...
	"prettier": "prettier --write .",
  	"types": "tsc",
	...
1
2
3
4
5
6package.json: updated rulesFinally, tell Husky which scripts to run in the
.husky/pre-commitfile. Your file should resemble the below:
#!/usr/bin/env sh
. "$(dirname -- "$0")/_/husky.sh"

echo "running pre-commit checks"

## prettier

npm run  prettier
npm run types
npm run lint
2
3
4
5
6
7
8
9
10
- Now, when you make a commit the above checks should run. If they fail, your code won't be committed.
# GitHub Workflows
A recent addition to GitHub is something known as workflows.
According to GitHub, "Workflows are defined in the .github/workflows directory in a repository, and a repository can have multiple workflows, each of which can perform a different set of tasks. For example, you can have one workflow to build and test pull requests, another workflow to deploy your application every time a release is created, and still another workflow that adds a label every time someone opens a new issue."
This is a very exciting prospect; we can use workflows to automate repetitive jobs. Today, we will consider how we can automate our static code checking on both a pull request to our room checker's master branch and a push request to any branch. Moving forward, we can define jobs that build and test our room-checking application. Over the course of a project, this could save you hours of manual, tedious labour.
# Task 3: Our First Workflow
TIP
⭐️
If you can't push and you are sure you are the only one working on branch you can use: git push origin <branch-name> --force
TASK 5: Our First Workflow
Let's create a workflow that will check the quality of code being committed to our remote repository.
- First, read the first page of the GitHub actions documentation (opens new window)
- In your room finder project, create the
.github/workflows/directory to store your workflow files. - Create a file in
.github/workflows/calledmain.yaml - Add the following code to
main.yaml
name: Checking Code Quality
on: ["push", "pull_request"] ## run on push and pulls
jobs:
  eslint:
    name: Run Code Quality Static Checks ## the name of our job
    runs-on: ubuntu-latest
    permissions:
      contents: read
      security-events: write
      actions: read # only required for a private repository by github/codeql-action/upload-sarif to get the Action run status
    steps:
      - name: Checkout code
        uses: actions/checkout@v3
      - name: Install Dev Dependencies
        run: npm install --only=dev
      - name: Run ESLint
        run: npm run lint
        continue-on-error: true
2
3
4
5
6
7
8
9
10
11
12
13
14
15
16
17
18
- Commit your changes
- Next, switch to a
mainbranch:git checkout -b main - Set up a GitHub repository to hold your project, and grab the remote address
- Remove the existing remote address:
git remote remove origin - Add your repository's remote address:
git remote add origin < your address> - Push to your remote repository:
git push origin main - If all has worked well, there should now be a green tick on the top of your repository:
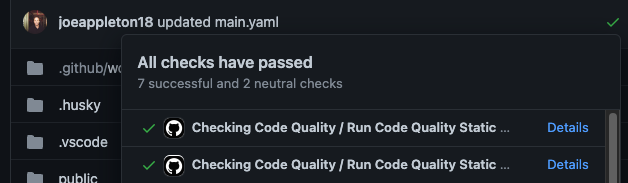
- You can also verify your job has run by clicking the actions button at the top of your repository:

- Can you expand
main.yamlto also check types and run prettier? - Check out a new branch, push to the remote repository, and raise a pull request: you should get a detailed report on the status of the jobs that have run.
- Bonus Task: GitHub actions has a marketplace of actions we can use (opens new window). Can you use the marketplace to create a new job that does something interesting. This project management example sparked my interest (opens new window). You can also do things like update discord on a pull request (opens new window)
# Task solutions
Solution corresponding to the task step number. You should attempt the task before you look at the solutions 😆.
SOLUTION (1) Click me to view the code
...
 - name: Run Prettier
        run: npm run prettier
  - name: Check Types
	run: npm run types
...
2
3
4
5
6
# Task 4: Home Study
Using what you have learnt so far:
- Static checking
- Automation (Huskey, GitHub Actions)
Create a starter Next.js project, and enforce coding standards and type checking: this will be useful for your assessment.