# Week 9 (Deploying to a Serverless Infrastructure)
TIP
Session Dependencies
This week we are continuing with our wine tasting theme. Please ensure you have the latest version of the project
You can clone this version using the following command:
git clone https://github.com/joeappleton18/db-starter-project.git --single-branch --branch week-8-solutions- This week we need to be working on a master branch. Run,
git checkout -b master
This week marks the end of our journey in learning the basics of creating database applications. To complete this journey, we need to consider how we might deploy our application. As such, the primary question for this week is:
# How can I deploy my data-driven web applications to a secure and scalable infrastructure?
Deploying a web application used to be a slow and painful process. You would have to physically provision multiple servers (staging and production) and then use a protocol like FTP or SSH to upload changes and patches to our codebase. The issue with this approach, due to its cumbersome nature, deployments may happen infrequently. To live up to the agile manifesto of fast iterations and quick deployments we need a more versatile solution, and this solution comes in the form of a serverless infrastructures and cloud hosting.
# Modern Deployment Options
Both cloud hosting solutions (e.g., Digital Ocean) and serverless infrastructures (e.g., AWS, Google Cloud and Azure) circumvent the need for us to maintain any physical hardware, and both can scale along with increased application demand. The key difference between these two solutions is with cloud hosting we need to install and maintain the servers software, with a serverless solution this is handled for us. In summary, both are fine choices. However, the process of installing and patching software takes more human resource. As such, we are going to be exploring a serverless infrastructure for our wine tasting application.
# What is a serverless infrastructure
According to Amazon (AWS, the largest provider of such an infrastructure, "A serverless architecture is a way to build and run applications and services without having to manage infrastructure. Your application still runs on servers, but all the server management is done by AWS. " (opens new window). They claim that a serverless infrastructure affords us the following benefits:
- No operating systems to choose, secure, patch, or manage.
- No servers to right size, monitor, or scale out.
- No risk to your cost by over-provisioning.
- No risk to your performance by under-provisioning.
The above benefits are all well and good; however, AWS is notoriously complex, and has a steep learning curve. Case in point, consider their infrastructure diagram for a simple todo list application:
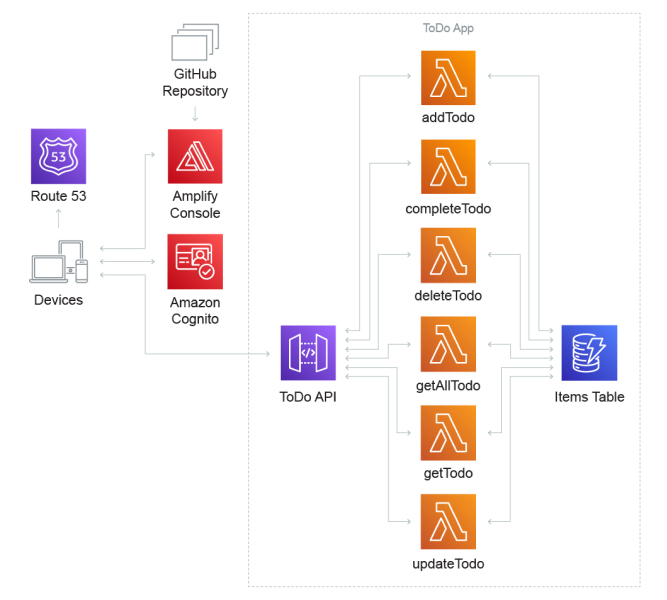
A, not so simple, serverless todo list. Adapted, from a digram provided by AWS.
Notice, in the above architectural digram, we have lambda functions (denoted by the lambda greek letter). These functions are discreet units of code that are executed through triggers. Lambda functions are an interesting proposition, as we only pay for them when they are invoked. However, such a set up is overkill for our little wine tasting application. As such, we are going to opt for services that offer a simplified abstraction layer over AWS.
# Our Infrastructure
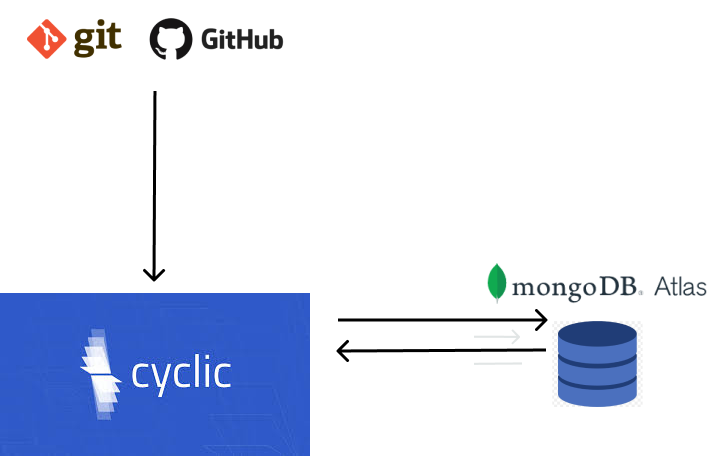
The infrastructure we are setting up this week - utilising Cyclic and MongoDB Atlas.
Rather than use AWS directly, we are going to be utilising two services that simplify its infrastructure - Cyclic and MongoDB Atlas (opens new window). Cyclic allows us to quickly deploy applications to a lightweight, secure, virtualised Unix container. Cyclic allows us to deploy applications by simply pushing our codebase to a main or master branch on a GitHub repository. While Cyclic will take care of running our node application, we'll use MongoDB Atlas to host our database. MongoDB atlas if a service offered by MongoDB which simplifies the process of provisioning and deploying cloud instances of MongoDB.
# Practical Session
We'll start the practical session by, first setting up our cloud database. Next, we'll move on to deploying our Node application to Heroku.
# Setting up our Cloud Database
Let's dive in and created a MongoDB Atlas account. This is a straight forward process:
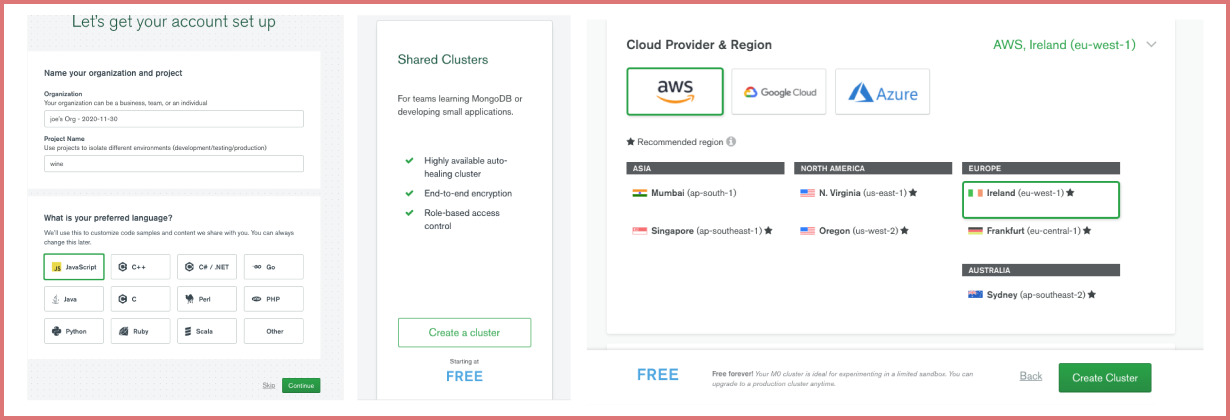
The first three steps in setting up a free Atlas Account.
- Register a new account (opens new window).
- On the next screen, you'll get the opportunity to set up a new project, name it "wine" and select JavaScript as the language choice.
- Select select a Free, shared, cluster.
- Finally, choose an AWS cloud provider and click "Create Cluster"
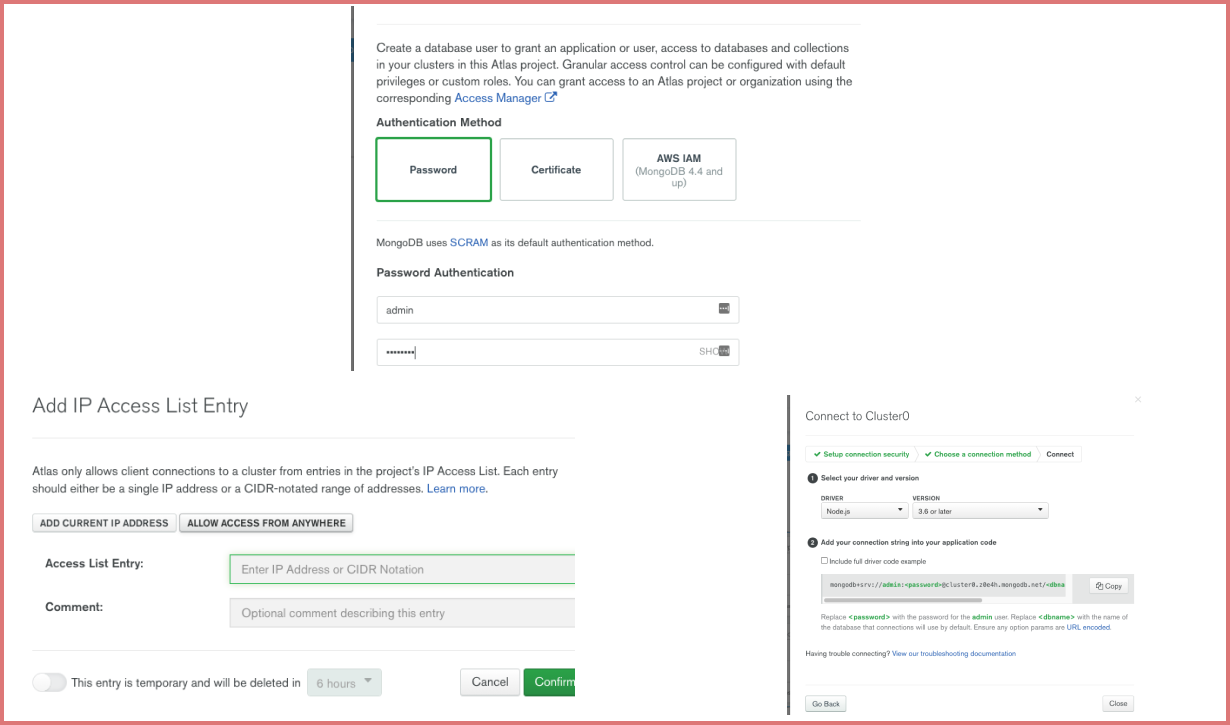
Configuring a cluster
- Next, we need to follow through the steps to configure our database cluster
- Under database access, set up an admin user and password
- Under network access, allow access from all IPs
- Finally clusters, click connect to cluster, click connect using NodeJS and grab the connection string
# Differentiating Between Development and Production - A little trip into DEV Ops
We need a way to allow us to differentiate between- We need to be able to differentiate between our production and development environment. In other words, we need to have two databases. One to hold our development data, and another to hold our production data.
To begin with, we need a way to allow our database seeder to seed a production and development database. This can be achieved through injecting a NODE_ENV variable into our seeder:
- We are going to use
cross-envto allow us to dynamically set env variable in ourpackage.jsonfile. Install it:npm install -D cross-env - Next, add a
MONGODB__PRODUCTION_URIproperty to your.envfile. You'll notice that the URI you've been using for staging contains the name of the database. As long as you've created a cluster with Atlas DB you can create several databases in this cluster by updating the database name in the connection string. Let's update our connection strings so we have tw databasewineandwineDEV:
MONGODB__PRODUCTION_URI=mongodb+srv://test:xxxx@cluster0.x08wt.mongodb.net/wine?retryWrites=true&w=majority
MONGODB_URI=mongodb+srv://xxxx:test@cluster0.x08wt.mongodb.net/wineDev?retryWrites=true&w=majority
2
- We can now set up some environment specific node scripts in
package.json:
...
  "scripts": {
    "dev": "nodemon app.js",
    "seedProduction": "cross-env NODE_ENV=production node seeder.js",
    "seed": "node seeder.js"
  }
   ...
2
3
4
5
6
7
Notice how we are using cross-env to set the production environment. Also not, we are not setting a NODE_ENV=development.
I like to assume, unless explicitly stated, we are working in development.
- Now, we can update the seeder to handle the production environment:
...
const { MONGODB_URI, MONGODB__PRODUCTION_URI } = process.env;
// don't copy and past this! It needs to be updated.
const client = new MongoClient(
  process.env.NODE_ENV === "production" ? MONGODB__PRODUCTION_URI : MONGODB_URI
);
...
2
3
4
5
6
7
- Notice how I am using the turnery operator to distinguish between production and dev.
- If all has gone well you should be able to seed production and development databases, by running:
npm run seed
npm run seedDevelopment
2
# Task 1 - Setting up Atlas DB and Seeding the Production Database
:::hint If you already have a Atlas DB account, you can start from the second step. :::
- Follow the steps above to set up a new database cluster
- From your Atlas dash, click
clusters/collections, and delete any existing databases that are in there. You may have one calledmyFirstDatabase, delete this. - Follow steps above to seed a production database.
# Setting up a Cyclic Deployment
Now we have a database set up, we are ready to deploy our application to Cyclic. This is actually a very painless process:
# Making our Application Deployable
To make our application deployable, we only need to make a few tweaks:
Ensure you are working on a master branch (see this weeks setup instruction, above)
When our application is deployed, Cyclic will look in our
package.jsonfile for a start script. It uses this script to run our app. Let's create a start command:
...
"scripts": {
    "dev": "nodemon app.js",
    "start": "node app.js"
},
...
2
3
4
5
6
package.json - a start script instructing cyclic how to run our application
Next we need a remote repository to host our wine application:
- Create an empty GitHub repository and take note of the remote address (***note, it must be empty in order to work on the Cyclic free tier).
- Point a terminal session to the root of your wine-tasting application and push your application to your new remote repository.
- Ensure the changes to your work are committed
git checkout -b master     # ensure you are on a master branch
git remote remove origin   # removes the existing remote
git remote add origin <your repo address>  # set up a new remote

git push origin master
2
3
4
5
6
7
run the above in the root directory of you wine tasting application
# Set Up
- We are now ready to deploy our application to Cyclic
Click on Link Your Own

Click on Search your repositories and find your repository containing the room finder application

Your application is now live! Well, sort of: we still need to set up an DB environment. take note of your applications URL and click to go to your application's dash.

Click on Variables

Add the MONGODB_URI environment variable. The value should be your production database's connection string. Click Add Variable and Save, when done

# Task 2 - Deploying your Web Application
Follow the steps above to deploy your wine tasting application to Cyclic.
# Task 3 - Set up a Project for Your Assessment
Configure a new deployable project for your assessment