Week 6 (Thinking about updating data)
sessions dependencies
You will need to make sure you are up-to-date with the tasks from week-4. You can find the solutions to these tasks on, a "week-4-solutions" branch of the "db-stater-project" GitHub repository.
You can clone the solution branch with the following terminal command:
git clone https://github.com/joeappleton18/db-starter-project.git --single-branch --branch week-4-solutions
introduction
This week, we are going to complete CRUD operations.
Recall, in week-4, we looked how to (R)ead and (D)elete data. This week, we will be completing the CRUD acronym by looking at (U)pdate .
We will be addressing the key question:
How can I add/update data to a MongoDB database whilst maintaining data consistency?
We will answer the above question by firstly thinking about what it means for data to be consistent. Next, we will move on to complete the create and update operations with the idea of data consistency in mind.
Thinking About Theory
As second-year university students, it is important to appreciate that you are not accessed on your ability to use technology. Rather, we want to see that you can understand and rationalise about the use of technology. As such, on a weekly basis, we will be considering and discussing key concepts. These concepts will guide you in justifying what type of database you choose. Importantly, you will be able to use these discussions to help with your assessment write up.
The Idea of Consistency
You would have heard me say "non-relational databases are not as consistent as their relational counterparts". Yet, what do I actually mean by this idea of consistency? Moreover, to what extent does it matter if our NoSQL MongoDB is not as consistent as its relational equivalent?
To ensure data consistency, historically, relational databases have abided to a principle known as ACID (Atomicity, Consistency, Isolation, Durability ). ACID is, in effect, a set of of properties that guarantees the validity and consistency of data despite system mishaps and errors. It achieves this through requiring database transaction to be treated as a single unit that either succeeds fo fails.
A transaction can be considered a sequence of database operations. The classic example is a banking system that is managing the transfer of funds between two accounts. In this example, we may need to conduct the following operations in sequence:
- Begin Transaction
- Debit Savings Account
- Credit Current Account
- Record in Transaction Journal
- End Transaction
A database that supports ACID transactions will ensure that all of the above operations succeed; or, the database is rolled back to its state before the transaction began. As you can imagine, for a business or safety critical system this is vitally important. However, many NOSQL database do not, or only partially, support ACID transactions. For instance, MongoDB has only recently started supporting ACID transactions across multiple documents.

Can you see how we can reduce the transactions on a simple account management section of an application
The developers of MongoDB (biased I know), argue that we have " been conditioned by 40 years of relational data modeling to assume multi-document transactions are a requirement for any database". [They go on to suggest that, due to fundamental differences in the NoSQL data models up to 90% of the time we do not need the complexity of multi-document transactions](https://www.mongodb.com/blog/post mongodb-multi-document-acid-transactions-general-availability). Such an idea, is in direct opposition, to a relational approach, where most of the time we would need to consider using transactions. The above diagram highlights this idea, how different data modelling approaches reduce the amount of transactions across a like data set
References
Truica, C.O., Boicea, A. and Trifan, I., 2013, August. CRUD operations in MongoDB. In 2013 International Conference on Advanced Computer Science and Electronics Information (ICACSEI 2013). Atlantis Press. Keep, M. and Cabral, A. (2018). MongoDB 4 Update: Multi-Document ACID Transactions | MongoDB Blog. [online] MongoDB. Available at: https://www.mongodb.com/blog/post/mongodb-multi-document-acid-transactions-general-availability [Accessed 9 Nov. 2020].
Practical
Before your start, ensure you have the latest version of our
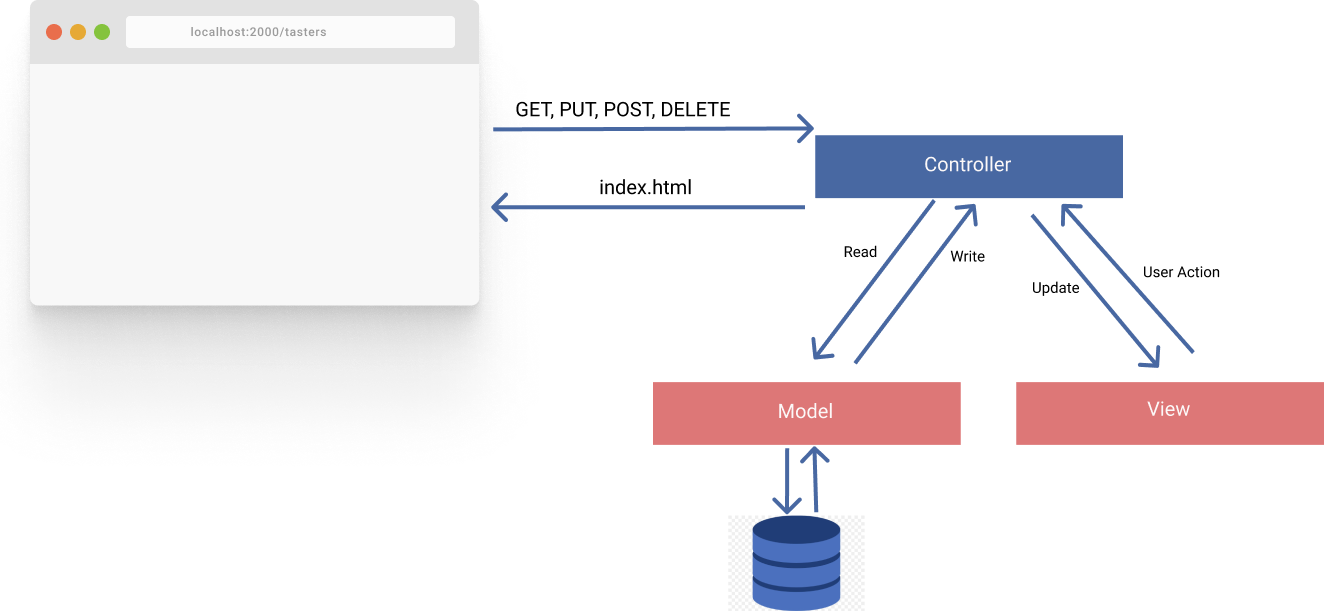
The classical MVC model in the context of browser communication. Notice how we facilitate updates through HTTP requests
This week is very special, as we are going to complete the MVC stack. In doing so, you are going to be able to add and update wine tasters 🍷🏭.
Handling a Form Post Request
In order to update our database, we need to allow users to enter data into our application.
The primary data transfer interface between the user and most web applications is, of course, a form. While there are many HTTP requests, a web form only facilitates two (GET and POST). There are ways to, effectively, forward a POST request on to a different type of request (e.g. PUT). However, for our wine tasting application, this may be overkill.
Consider the ejs file, views/create-taster.ejs, you'll see I've created a form for you. Notice the key attributes that allow us to communicate with the server (method, action, name):
<form method="POST" action="/create-taster">
  ...
  <input
    type="text"
    class="form-control"
    id="name"
    name="name"
    placeholder="Enter Name"
  />

  ...
</form>
2
3
4
5
6
7
8
9
10
11
12
views/update-taster.ejs
Not found: /Users/joeappleton/tmp/advanced-database-systems-2021/<<<< HEAD Above, when a user submits a form, we tell the browser to construct a post request, method="POST". Send that request to our currenturl/create-taster, action="/create-taster". Finally, we use the name attribute to bind the value of each input to a distinctive name for later server access, name=joe. Express makes it very simple to trigger a function when a POST request is sent to the server:
Above, when a user submits a form, we tell the browser to construct a post request, method="POST". Send that request to our currenturl/create-taster, action="/create-taster". Finally, the browser uses the name attribute to bind the value of each input to a distinctive name for later server access (e.g, name = joe). Express makes it very simple to trigger a function when a POST request is sent to the server:
9b496f919c531d053b74ad9034f6d8587ff67e9b
app.post("/create-taster", tasterController.create);
2
3
Express provides handlers for all http requests
Task 1 - Implement the Create the Taster Route
While we have a create-taster view set up, there is currently no route, let's fix this:
We don't really need a dedicated controller just to display the form. Add a new
/create-tasterroute inapp.jsthat renders ourcreate-tasterview. You should now be able to view the route<your host>/create-taster. Next, you should update the link on the create taster button intasters.ejs, it should link to your new view.Within
controllers/taster.jsconstruct a function to handle our posted form data. For now, we will just log the post req to our console.
exports.create = async (req, res) => {
  console.log(req);
  res.send("done");
};
2
3
4
Not found: /Users/joeappleton/tmp/advanced-database-systems-2021/<<<< HEAD- Create a rout in
app.jsthat passes our new function to apostrequest that is sent to/create-taster. If all has gone well, you should see the request logged to your console (the terminal window where you ran you application) when you submit the form. However, it does not look like there is any form data in there!? ======= - Create a route in
app.jsthat passes our new function to a post request that is sent to/create-taster. If all has gone well, you should see the request logged to your console (the terminal window where you ran you application) when you submit the form. However, it does not look like there is any form data in there!?
9b496f919c531d053b74ad9034f6d8587ff67e9b
We need to add, what's know as middleware, to process our incoming HTTP requests and append the post data to these requests before they hit our controllers. We can use the, body-parser package to achieve this.
- Install it
npm install body-parser - Require it, at the top of
app.js-var bodyParser = require('body-parser') - Finally, we need to instruct express to use it. In
app.js, insert the following code:
app.use(bodyParser.json());
app.use(bodyParser.urlencoded({ extended: false }));
1
2- Install it
If you now submit the create taster form you should see that the form values are included in the request:
body: [Object: null prototype] { name: 'foo', twitter: 'barr' },
- You can access each form value by using the standard dot notation,
req.body.nameandreq.body.twitter
Creating a New Document Using Mongoose
We can now access incoming requests! Let's move on to consider how we might create a new document using a Mongoose Model. We shall explore this idea through extending our controllers/taster.js create operation.
exports.create = async (req, res) => {
  let taster = new Taster({ name: req.body.name, twitter: req.body.twitter });
  try {
    await taster.save();
    res.redirect("/tasters/?message=taster has been created");
  } catch (e) {
    return res.status(400).send({
      message: JSON.parse(e),
    });
  }
};
2
3
4
5
6
7
8
9
10
11
controllers/taster.js, a controller operation to create a new taster
Above, we first use our model to initiate a new document object and save it to the const taster (l.1). Next, to create a new record in our database, we call the aysnc operation taster.save(). Finally, we redirect back to our list of tasters.
Task 2 - Creating a New Taster
Use the documentation above to update your project so you can create new tasters.
Notice, in the above create taster example, we use a query string to append a message to the URL that should be displayed to the user -
res.redirect('/tasters/?message=taster has been created'). Can you set up a basic user alert that displays the message when the use gets redirected to /tasters/.- Bootstrap has a range of different alerts you can use
- Recall, express allows us to grab query string values from a request -
const message = req.query.message;
If all has gone well, you should now be able update a record. While at the same time receiving basic user feedback. While we are not going for any design awards her, like your assessment should be, the application is functional.
Validating our Taster
While we have the functionality to add a new tasters. We are still not conforming to the C in ACID, which dictates:
"all data will be consistent. All data will be valid according to all defined rules, including any constraints, cascades, and triggers that have been applied on the database."
Currently, we only have some basic schema definitions in models/Taster.js. While this is better than nothing, we could still create a new taster with no name, or enter any random string value for their twitter address. This means, our data may not be consistent or valid 😱 This is, of course, not ACID compliant or a sensible approach to database development. Luckily, Mongoose affords us a very robust set of validators! Let's consider how we could start adding some basic validation to our models/Taster.js model.
const mongoose = require("mongoose");
const { Schema } = mongoose;

const tasterSchema = new Schema(
  {
    twitter: String,
    tastings: { type: Number, default: 0 },
    name: { type: String, required: [true, 'Name is required'], minlength: [3, "Name must be 4 chars long"] },
  },
  { timestamps: true }
);

module.exports = mongoose.model("Taster", tasterSchema);
2
3
4
5
6
7
8
9
10
11
12
13
models/Taster.js- we've added some basic validation
Look, above, how easy it is to add validation and further properties to enhance data validity? Notice how we can expand each property on schema object to contain further constraints. For instance, 'tastings' must be Number and it has a default value of 0 (l.7); recall, it contains the number of tastings a taster has conducted. Next, consider 'name', it is required and has a minlength (l.8). Notice the arrays which set the validator and then contain a custom error message, this is very handy for user feedback. Mongoose has the following built in validators:
- All SchemaTypes have the built-in
requiredvalidator. - Numbers have
minandmaxvalidators. - Strings have enum, match,
minlength, andmaxlengthvalidators.
You can also use a unique option. This is not a validator, but rather a helper for creating MongoDB unique indexes. You should note, according to the MongoDB documentation, 'MongoDB cannot create a unique index on the specified index field(s) if the collection already contains data that would violate the unique constraint for the index'.
Handling and Displaying errors
We are now validating our taster form data; however, we are not displaying any meaningful feedback to the user - let's address this.
When we try and save a model, if it does not validate, mongoose will throw an exception which includes the validation error messages in an error property. All we need to do is catch this error and make the error messages available to our create-taster view. We can then display the errors to the user.
exports.create = async (req, res) => {

  try {
    const taster = new Taster({ name: req.body.name, twitter: req.body.twitter });
    await taster.save();
    res.redirect('/tasters/?message=taster has been created')
  } catch (e) {
    if (e.errors) {
      console.log(e.errors);
      res.render('create-taster', { errors: e.errors })
      return;
    }
    return res.status(400).send({
      message: JSON.parse(e),
    });
  }
}
2
3
4
5
6
7
8
9
10
11
12
13
14
15
16
17
18
19
controllers/taster.js - we catch and inject the error object into our create-taster view
Above, we capture validation errors and pass the errors to the 'create-taster' view. We are making an errors object available to this view so we can display them to our user (l.10). There is a slight gotcha here, we are only making an errors object available to our view if an error occurs. This makes things a little tricky as this object wont be available in our standard view and evaluating it will cause an error (how ironic). To fix this issue, let's update our create-taser route to contain an empty errors object:
app.get("/create-taster", (req, res) => {
  res.render("create-taster", {errors: {}});
});
2
3
app.js - above we mock out a empty errors object, this makes our lives a little easier.
We can now, within views/create-taster.ejs, evaluate the errors object and display any error messages to the user.
<form>
  ...

  <div class="form-group">
    <label for="name">Taster Name</label>
    <input
      type="text"
      class="form-control"
      id="name"
      name="name"
      placeholder="Enter Name"
    />

    <% if (errors['name']) { %>
    <p style="color: red"><%= errors['name'].message %></p>
    <% } %>
  </div>

  ...
</form>
2
3
4
5
6
7
8
9
10
11
12
13
14
15
16
17
18
19
20
views/create-taster.ejs- Displaying an optional error message for our taster name
Looking at the code above, you'd be forgiven for thinking our errors object is an array. After all, we are accessing, elements within it, like this, errors['name']. However, this is not the case, we can use the square brackets syntax as a, dynamic, alternative to dot notation. In other words, errors['name'] ==== errors.name. It's necessary to use this alternative notation when accessing nested objects, as JS only allows a dot in the context of EJS objects. Hencesingle, I've used this notation errors['name'].message.
Task 3 - Validate the Wine Tasters
- Add basic validation to your taster model. For instance, the name should be required and some chosen min length
- Work out how to add a custom validator to validate if a user has entered a valid twitter handle. Hint, use a regx within the custom validator
- Construct error messages in your taster's model validators and displays these errors if they try to create an erroneous taster.
Updating Data
Let's bring this weeks learning to a close by considering how we might add the functionality to update our wine tasters. Rather than walk you through the exact solution, I am going to give you some tips and let you work out the granular details yourself.
First, let's think about how this process is going to work:
A user visits,
/tastersand sees a list of tasters. They click the edit button, for any given taster, and are redirected to a url that conforms to the following formattasters/update/5f9ac08e4d0e84e15e7c50f7. Where the long string, is the id of the taster we want to update. You've seen how we have achieved similar functionality for our delete route.We need to find the taster by the id param that is contained in the url, and throw a 404 error if the given taster does not exist. You can use the
findByIdmethod to achieve thisconst taster = await Taster.findById(id);We need to insert the information of the taster we want to edit into our form. This is actually very easy:
<input
  value="<%= taster.name %>"
  type="text"
  class="form-control"
  id="name"
  name="name"
  placeholder="Enter Name"
/>
2
3
4
5
6
7
8
An example of how we can set the value of a form field, according to values provided by our server side code.
Finally, we need to consider how we can validate the form, and update a taster. Very similar to what we did for creation; however, we can use the, Taster.updateOne({ _id: id }, req.body); method instead of create.
Task 4 - Update the Tasters
Follow the hints above and add the functionality that allows tasters to be updated. If you need any help, you can find my solutions on a week-6 branch of our ongoing project