Week 4 - Completing the MVC stack
At this stage you should be starting to think about your application that you will be working on for your assessment. Recall, we are just trying to create a simple proof of concept. What is key, you will need to demonstrate that you can pull together the basic elements of a data driven web application to present a simple solution to clearly defined problem.
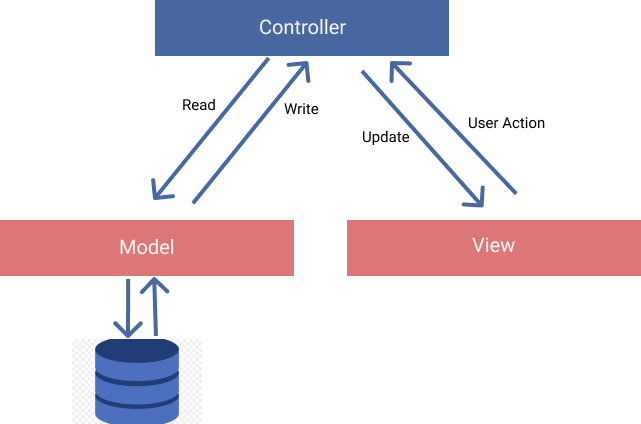
I am very excited about this week as we will be tying together everything we have learnt so far. In doing so, we are going to be exploring how we can construct a model layer to our application. Thus completing our MCV stack.
The MVC Stack
The classic MVC stack
Above is a diagram of the architecture that we are constructing. The Model-View-Controller (MVC) separates and application in two three logical components: the model, view and controller.
Configuring an Application
I want to take a quick aside and look at how we can, flexibly, configure our NodeJs applications.
According to the Twelve-Factor App, "An app’s config is everything that is likely to vary between deploys (staging, production, developer environments, etc).". For instance, in development we will not want to be using our production database. As such, we want to be able to specify, environment specific, applications settings. To achieve this, we can use environment variables.
An environment variable is a dynamic name-value pairing that is typically provided by an operating system. What is key, they belong to the environment your application is running on (the operating system), not the application itself.
Within a node application, the environment is available to us through the process.env variable. To add custom values to this variable we can use a node module called dotenv coupled with a .env file. The .env file contains our environment variables. It's important to note that the .env file is environment specific and should be added to your .gitignore file so it is not entered into version control. Below is an example of how this configuration works:
    BASE_URI=http://localhost
    DB_NAME=wine
    WEB_PORT=8080
    MONGODB_URI=mongodb://localhost:27017
2
3
4
a
.envfile, placed in the root directory of our project
require("dotenv").config();
console.log(process.env.PORT);
2
we can use the .env settings through the "dotenv" module. Wha
Task 1 - Setting Up our Sample Application
For the rest of this unit, I will be providing you with a sample application which builds on our wine tasting dataset. I intend to ensure you are all starting with the same code base and will provide you with an up-to-date version the application each week. To get started this week:
You'll notice you will need to seed the database and rename the ".env.example" file to ".env". Further to this, you will also need to run the database seeder.
You should take a look at the seeder.js file and ensure you have an idea how it works. Using a small side utility to seed a database is common.
Introducing Mongoose

An overview of Mongoose
According to Mozilla, there are two approaches to programatically interacting with databases. We can use a query language specific to our given database solution. Alternatively, we can turn to a Object Data Model ("ODM") or an Object Relational Model ("ORM"). ODM/ORMs abstract away from the underlying database and provide a simplified API. Further to this, they can extend the functionality provided by the native database.
In this module, we will be using Mongoose, one of the most popular ODMs used in the NodeJS ecosystem. On the surface, Mongoose is a light abstraction that sits on top of MongoDB. However, it offers some very useful extensions (e.g., Schemas, Models and Validation). This week we will be exploring:
Installing Mongoose
We can install Mongoose using NPM:
npm install mongoose --save
Once installed, we need to instruct Mongoose to connect to our database. In app.js we can add the following code:
const mongoose = require("mongoose");
const { WEB_PORT, MONGODB_URI } = process.env;

mongoose.connect(MONGODB_URI, { useNewUrlParser: true });

mongoose.connection.on("error", (err) => {
  console.error(err);
  console.log("MongoDB connection error. Please make sure MongoDB is running.");
  process.exit();
});
2
3
4
5
6
7
8
9
10
Telling Mongoose to connect to our MongoDB instance. Notice how we are using an environment variable, the value of which can be located in
.env, for our connection string.
Defining a Model
Recall, in a MVC architecture, a model is the layer that communicates with the database.
Models in our application will live in a models folder. As per standard practices we will have a single model per database collection. The model represents the shape of a document in a given collection and also allows us to run operations on the said collection.
We should follow a strict naming convention for our models. Each model should live in a models folder and should be the singular name of the collection it represents with the first letter upper case:
DB-STARTER-PROJECT
│   README.md
│   app.js
│
└───models
│   │   Taster.js
│   │   Tasting.js
2
3
4
5
6
7
8
This is how our application will look when we create our models. If you check your mongo database you will see that the models relate to two collection, tasters and tastings.
Now we know where our models live, we can consider how we define them. Let's start with a model called Taster that will shape documents that live in our tasters collection. Below is what each document currently looks like:
{
        "_id" : ObjectId("5f93092985809597ee2b275f"),
        "twitter" : "@mattkettmann",
        "tastings" : 6332,
        "name" : "Matt Kettmann"
}
2
3
4
5
6
7
A single document from our Tasters collection
Recall, MongoDB is schemaless, this means there are no constraints in place to ensure future documents resemble the our example above. This could be a little risky, if our documents lack consistency we can't run common operations across a given collection. Mongoose allows us to define a schema that will police the data in our document, we then pass this schema into a mongoose model. To understand how this works, let's define our model in models/Taster.js:
const mongoose = require("mongoose");
const { Schema } = mongoose;

const tasterSchema = new Schema(
  {
    twitter: String,
    tastings: Number,
    name: String,
  },
  { timestamps: true }
);

module.exports = mongoose.model("Taster", tasterSchema);
2
3
4
5
6
7
8
9
10
11
12
13
Defining a model, this code should live in
models/Taster.js
As you can see above, each name/value pairing in our schema definition "defines a property in our documents which will be cast to its associated SchemaType". For instance, Twitter will be a string. Notice how we have not defined our _id field. This is because, by default, mongoose adds an _id property for us. Furthermore, notice how we have passed in the following object: { timestamps: true } into our Schema method. This option tells mongoose to assign createdAt and updatedAt fields to our schema. Finally, observe how we define a model and export that model in one fell swoop, module.exports = mongoose.model("Tasters", tasterSchema);. It is important to know that the model must be named the upper case singular version of its corresponding collection. In this case, our collection is called "tasters" so the model name is, "Taster".
Task 2 - Define a model for the tasters collection
Use the notes above, and the Mongoose documentation, define a model for your tasters collection. You won't actually be using the model yet, this comes next!
Controllers
The controllers in a MVC architecture handle incoming HTTP requests, use models to gather data and hand this data to a view. They are the glue that holds our application to together. In our application, controllers will live in a controllers folder and will represent a specific domain of our application.
The naming convention will be singular lower case. As such, our application structure will represent the following:
DB-STARTER-PROJECT
│   README.md
│   app.js
│   ....
└───models
│   │   Taster.js
│   │   Tasting.js
└───controllers
│   │   taster.js
│   │   tasting.js
└───views
│   │   index.ejs
|   |   ...
....
2
3
4
5
6
7
8
9
10
11
12
13
14
Our application now resembles an MVC architecture
Let's define two operations in our taster controller (delete, and list). Delete, will delete a taster document and list will list all of our tasters:
const Taster = require("../models/Taster");

exports.list = async (req, res) => {
  try {
    const tasters = await Taster.find({});
    res.render("tasters", { tasters: tasters });
  } catch (e) {
    res.status(404).send({ message: "could not list tasters" });
  }
};

exports.delete = async (req, res) => {
  const id = req.params.id;
  try {
    await Taster.findByIdAndRemove(id);
    res.redirect("/tasters");
  } catch (e) {
    res.status(404).send({
      message: `could not delete  record ${id}.`,
    });
  }
};
2
3
4
5
6
7
8
9
10
11
12
13
14
15
16
17
18
19
20
21
22
This code should be placed in
controllers/taster.js
There are a few points to note above. First, notice how we are not handling specific routes. Rather, we are simply defining and exporting multiple functions that, in app.js, will be attached to given routes. Second, notice how in our list function we are passing data into our view, res.render("tasters", { tasters: tasters });. Finally, you should note that we are grabbing an id parameter of the document to delete in our delete function: const id = req.params.id;.
Connecting controllers to routes
As we now have a taster controller set up, we can use the logic defined in it to process incoming HTTP requests within app.js.
const tasterController = require("./controllers/taster");
app.get("/tasters", tasterController.list);
app.get("/tasters/delete/:id", tasterController.delete);
2
3
notice how we use . notation to access each function that we have defined in our controller. Moreover, you should also observe that we define ad
:idwild card on our delete route. This gives our controller access to anidparameter. For instance, if we were to visit the routelocalhost:<port>/tasters/delete/123our id param would equal 123.
important
Ensure that you do not leave your old route in.
app.get("/tasters", (req, res) => {
  res.render("tasters");
});
2
3
this function should be converted to your new route.
You should now be able to visit tasters in your application. However, you'll notice that we are not currently using any of our taster data that we passed in, ejs has our backs here.
Presenting Data with ejs
Recall, in our taster/list controller function we passed into our render method an object { tasters: tasters }. While this object only contains one property, it could contain as several (e.g. { tasters: tasters, title: "wine taster", taterCount: 10 } ). Each on of these properties is assigned to a variable and made available to us in our view. For instance, enter the following into your tasters.ejs file:
<%= tasters[0] %>
You should see that you have access to the tasters array, and have displayed the first element. Of course, with arrays we need a little more flexibility. After all, we don't know the length of the array. EJS allows us to construct and use JavaScript control structures. As such, we can do something like this:
  <ul>
      <% tasters.forEach(function(taster){ %>
                    <li><%=  taster.name  %></li>
      <% }); %>
  </ul>
2
3
4
5
The above block uses the forEach array operation to iterate across the tasters array. Notice how we mix in control logic (our loop), raw html (ul, li) and output logic (<%= taster.name %>). This takes a little getting used to, and you should read more of the EJS documentation.
Task 3 - Completing the View layer
Can you complete the view layer so the wine tasters are displayed int the table.
You should also be able to add the delete functionality, so you can delete wine tasters (remember you can just use the seeder to reset everything). A tip, we can delete a given taster by visiting the delete url with the id parameter of the taster we want to delete. Your code will look something like this:
href="/tasters/delete/<%= taster._id %>"
Task 4 ( extended project) - Adding MVC layers for tastings
Now you know the basics, can you construct MVC layers for our tastings collections. You can use the table we are using for tasters. To begin with limit your results to ~50 tastings.
Consider how you can paginate the results as we have many thousands of tastings. Pagination is quite advanced, but an interesting challenge. This article is good. Further to this, boostrap has some built in pagination controls we can use