Practical Session and Guided Learning
Relational Database
In your first year, you were introduced to the concept of relational databases. In a relational database data is stored tables. Conceptually, the data is represented much in the same way as a spreadsheet. For instance, a student table could something like this:
| # | Student Name |
|---|---|
| 1 | Joe Appleton |
| 2 | John Smith |
A simple database table. The values that you can place into the student's table are governed by a schema, that you design first.
| Field | Type | Null | Key |
|---|---|---|---|
| 1 | int(11) | NO | PRI |
| 2 | text | NO |
A simple database schema
Relational database management systems (RDBMS), at the time of writing, are 50 years old. They present a very mature technology and are highly consistent. That is, any data written to the database is valid according to developer-defined constraints. In other words, an RDMS prioritises data integrity. We can conclude, if we are developing a system where data consistency and precision is vital then an RDBMS is the best choice. However, while an RDBMS will work for any application, managing schemas across multiple environments can be a, complex, time-consuming undertaking. Further to this, often data from several tables must be aggregated before it is suitable for a user facing view.
NoSQL Databases
We have established that an RDBMS prioritises data consistency and integrity, at the cost of complexity and readability. NoSql (Non-relational databases), on the other hand, provide read and write simplicity. However, they do not comply the rigorous data consistency standards of their RDMS counterparts. While sacrificing data consistency may be unacceptable for an application monitoring financial transactions. For many applications, especially web applications, it is a not a major issue if data is slightly out of sync.
As with their RDMS counterparts there are many different types of NoSQL databases, with the most popular being:
- Document Stores
- Key-value stores
- Graph-based
In this module, we are going to be looking at the document store, MongoDB.
MongoDB
According to its developer, MongoDB’s document model is simple for developers to learn and use, while still providing all the capabilities needed to meet the most complex requirements at any scale.
Instead of tables, data is stored in documents. Documents are constructed using flexible JSON-like documents. For instance, a student record could look like this:
{
	"_id" : ObjectId("5f688fb800bcd2661917a892"),
	"name" : {"first" : "Joe", "last": "Appleton"},
	"age" : ISODate("1982-12-21T00:00:00Z")
}
2
3
4
5
An example of a MongoDB object
Setting up a development environment
It is most convenient to configure a local development environment. This process should be simple, as we need minimal dependencies to get going, just NodeJS and MongoDB. You will not be able to install MongoDB at University. However, you should certainly do this if you are using your own computer.
Mac Installation
Install, the package manager, HomeBrew. Follow the instructions on the website, this is a useful tool to have
From a terminal Window, run the following commands:
  brew update
  brew tap mongodb/brew
  brew install mongodb-community@4.4
1
2
3- You should now be able to start and stop Mongo using the following commands:
    brew services start mongodb-community@4.4
    brew services stop mongodb-community@4.4
1
2Next, if you type into a terminal window "mongo" you should access the MongoDB shell
Windows Installation
- You will need to download and run the msi package from the Mongo Downloads Section - ensure that you download community edition.
- You then need to proceed through each step of the wizard
- Select complete installation
- Ensure that you install MONGO as a network service
- Assuming you did not change the defaults, create the directory 'C:\Program Files\MongoDB\Server\4.4\data'
- You can now start the server by clicking "C:\Program Files\MongoDB\Server\4.4\bin\mongod.exe"
- Next, clicking "C:\Program Files\MongoDB\Server\4.4\bin\mongo.exe"" should bring up the shell
Setting up our Cloud Database (use this option to work from university)
Let's dive in and created a MongoDB Atlas account. This is a straight forward process:
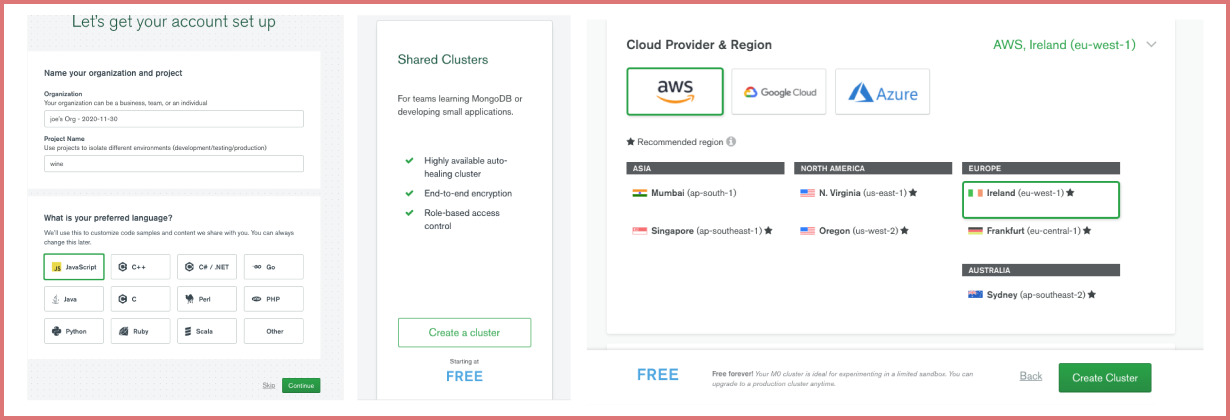
The first three steps in setting up a free Atlas Account.
- Register a new account.
- On the next screen, you'll get the opportunity to set up a new project, name it "dbwork" and select JavaScript as the language choice.
- Select select a Free, shared, cluster.
- Finally, choose an AWS cloud provider and click "Create Cluster"
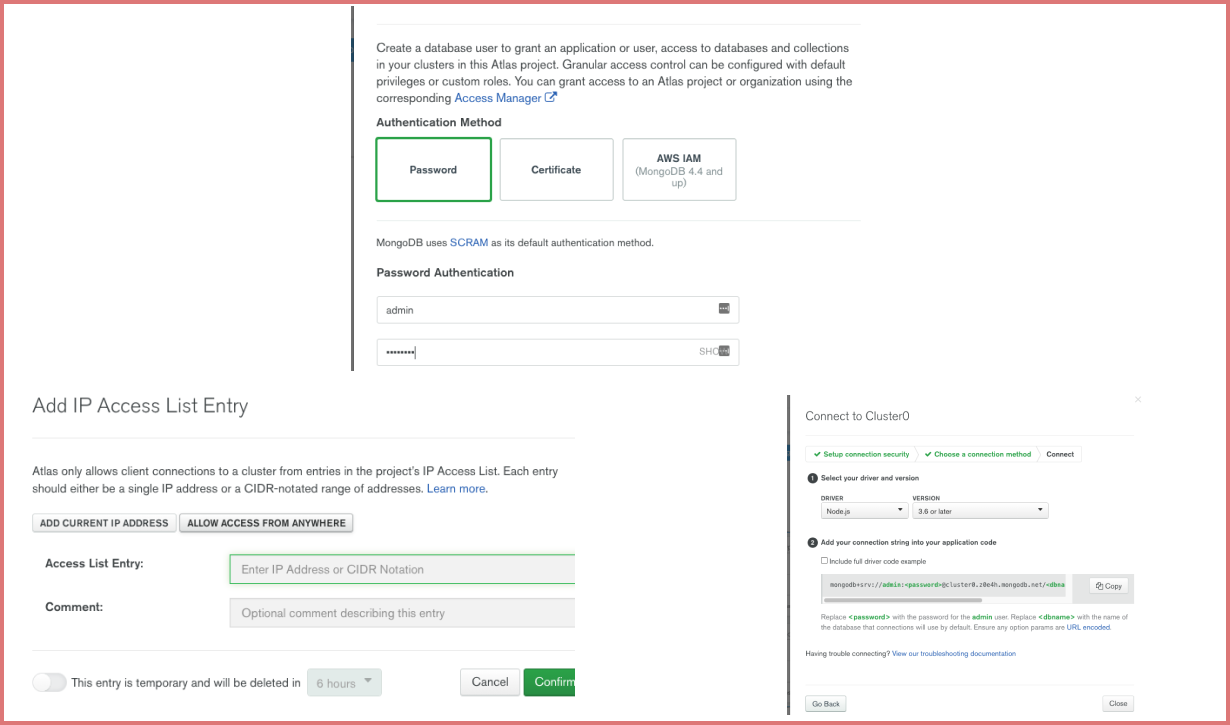
Configuring a cluster
Next, we need to follow through the steps to configure our database cluster
- Under database access, set up an admin user and password
- Under network access, allow access from all IPs
- Finally clusters, click connect to cluster, click connect using NodeJS and grab the connection string
Installing NodeJS
- Node is simple to install, simply visit the download
- Next, visit command line and run "node -v", you should seem something along the lines of "14.11.0"
Here is hoping that went smoothly; if it did, we are now ready to proceed with our first node application.
Task 1
Follow the instructions above to set up your own development environment. Further to the above installation steps, you may also want to install Robot 3T.
Sample Applications
I don't advise that you just copy and past these code blocks in, you will not learn anything. Instead, you should type the examples in and consider what each line of code is doing.
- First we need to create a folder where all of our practical work will live for this module, e.g. "database-systems/". You'll want to place this folder under version control.
- Next, within your database-systems folder create a further folder called “week-1”
- Finally, point a terminal window/command prompt to your week-1 folder and run "npm init -y".
Sample Application 1
- Let's make our first Node web application
- Within your week-1 folder create the file sample_1.js
- Type in the code below
- Run you application by pointing your IDEs (normally visual code) terminal to your week_1 folder and input the command
node sample_1.js - Now visit your browser, and see what happens! You should see "hello world". Next, take a look at your terminal, this is where your console.log() statements will be be output.
const http = require("http");
const server = http.createServer();

server.on("request", (req, res) => {
  const { method, url, headers } = req;

  console.log(method);
  console.log(url);
  console.log(headers);

  res.end("hello world");
});

server.listen(8080);
2
3
4
5
6
7
8
9
10
11
12
13
14
A simple Node Application
Do not worry if the code above seems somewhat alien to you; much of it may be new. In short, we are setting up web server that is listening on local host port 8080. When a client connects, we simply return hello world.
To achieve this, we first must pull in Node’s http module (l.1). Next, we create a new server instance (line 2). Finally, we tell the server to listen for incoming requests on port 8080 (l.14).
Then we set up an HTTP request handler (l.4). When an HTTP request is received the function, which is the second argument passed into server.on(), is fired. Two objects are passed into this handler function (res, req). As you can see we can use these objects to inspect the type of request (l.7 - 8) and write a response to the client (l.11).
Sample Application 2
Let's try and take things a little further and use node to manipulate a mongo database.
- In your
week_1folder, create the filesample_2.js. - Next, we need to install the official MongoDB Node.js driver within your
week_1folder run the following command:npm install mongodb --save. Check yourpackage.jsonfile, you should see the mongo dependency in there. - Finally construct the program below and run
node sample_2.js - Visit, in your browser,
http://localhost:8080 - After execution. If you are working using a local instance of mongodb open up the mongo command shell (see above) and run the following commands:
use studentdb.students.find({})
- If you are running a cloud version, click on "databases (in the side bar) -> view and monitoring -> collections"
- You should see a list of students in your database
const http = require("http");
const server = http.createServer();
const { MongoClient } = require("mongodb");

// this will be something like "mongodb+srv://test:test@cluster0.x08wt.mongodb.net/myFirstDatabase?retryWrites=true&w=majority" if you used the cloud db, or "mongodb://localhost:27017" if you use a local install;
const url = "your connection url";

const dbName = "test";
const client = new MongoClient(url, { useNewUrlParser: true });
const students = [
  {
    name: { first: "joe", last: "appleton" },
    dob: new Date("August 12, 1982"),
  },
  {
    name: { first: "bill", last: "smith" },
    dob: new Date("August 12, 1982"),
  },
];

server.on("request", async (req, res) => {
  try {
    await client.connect();
    const db = client.db(dbName);
    const collection = db.collection("students");
    await collection.insertMany(students);
    res.end("request ended");
  } catch (e) {
    console.log(`could not update ${e}`);
  }
});

server.listen(8080);
2
3
4
5
6
7
8
9
10
11
12
13
14
15
16
17
18
19
20
21
22
23
24
25
26
27
28
29
30
31
32
33
Let's explore the above code.
Firstly you can see that we set up a a variable to hold the connection url (l.5). The number after the colon is the port that database server is listening, 27017 it the default port.
Notice how we pre-append the keyword async to our http handler function (l.9). For now, just appreciate that we need to do this so we can, at a later point in the function, use await (l.22 & l.25)
Next, in the handler function, we are connecting to MongoDB and selecting the student database (l.23 - l.24). We then select the collection students and insert our students records in bulk (l.24 - l.25).
Task 2 Implement the Sample Applications
Implement the above two samples for yourself. Type in the code, as you go along review the sections of the node and https://docs.mongodb.com/ documentation that relate to the code that we are typing in.
Guided Learning
- When you get home, set up a your own development environment.
- Can you play around with our student database and add some further operations
Documentation
A more readable version of the node docs
A guide to some of the commands you can run in the MongoDB Shell
Academic
A interesting masters paper exploring the performance of different types of databases